How to create a docker container for a WordPress website
This is my first post on Docker so please be gentle. I am going to start with something easy: how to create a Docker container to host a WordPress website.
One word before we start: don’t do this on a production server! There are more rules and checks you have to do, this is just an introduction, good for a dev/demo environment.
So, I assume you already have docker and docker-compose installed on your system, but in case you don’t, there’s an excellent documentation on the Docker’s website.
The first step is to fire up the terminal, create a folder and save the contents of this gist to a file named docker-compose.yml .
Next step is to fire up the containers with this command:
docker-compose up -d
the -d is the “detached mode”, allows you to run the containers in background and keep using the terminal.
Now, if you take a look at our Compose configuration, on line 22 we have specified an host address for the mysql instance. It might be already correct, but better check.
From the command line, first run
docker ps
to get the list of running containers. You should see something like this:

using docker ps to get the list of containers
Grab the name of the db container and run
docker inspect wptestfull_mysql_1
You will get a big JSON object exposing the status and all the available properties of the container. At the end you should get this:
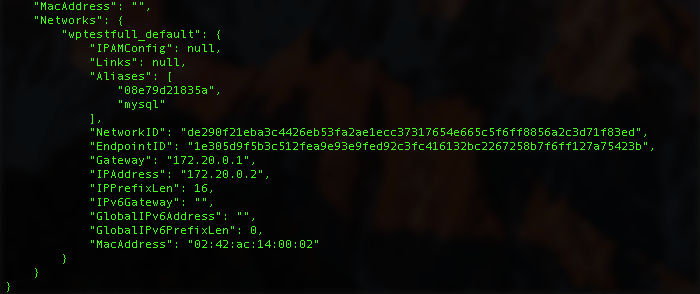
using docker inspect to get the container ip address
there you go, our IPAddress. Copy it into the docker-compose file and run again docker-compose up -d .
Now we need to create a db user. Open your browser and go to http://localhost:8181/ , you will see the phpMyAdmin interface. Create the user, the db and set the allowed hosts to % . This way we will allow connections from every address. Again: don’t do this on production!
Now all you have to do is to load http://localhost:8080/ and setup your WordPress instance 🙂
Next time: what if we want more than one website?
Did you like this post? Then