UI notifications system with Blazor and SignalR - part 1
Hi All! Today we’re going to see how we can write a UI notification system. We will use Blazor to render the UI, SignalR to handle the client/server communication, and OpenSleigh to execute the background operations.
Our goal is to allow the user to trigger the execution of a long-running operation. The gruntwork might be composed of multiple steps and has to be performed in the background, without blocking the UI.
However, we also want to inform the user of the current status, by sending notifications as soon as an event occurs.
A practical example could be the Azure Portal: the user performs any operation, like creating an Application Service. The operation is performed in the backend, and the Portal will show a status notification on the top right when it’s done.
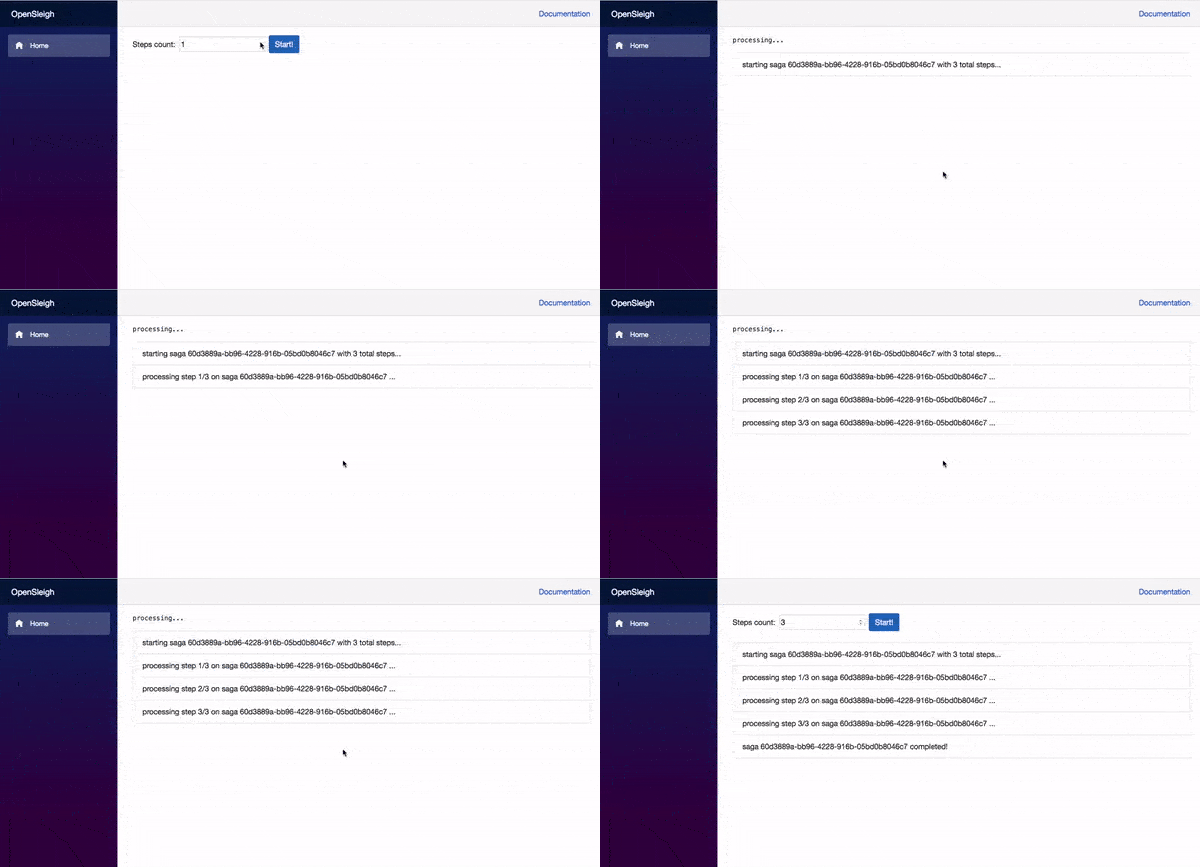
Our application will of course be much simpler than the Azure Portal, but the basic idea remains untouched:

We can set the number of steps we want to perform and then trigger the execution in the backend, using OpenSleigh.
For the front-end we will be using Blazor Webassembly. The first thing we have to do is add the Microsoft.AspNetCore.SignalR.Client NuGet package.
SignalR will help us sending messages back and forth between the client and the server, handling real-time updates.
The next step is to create a Razor page:
@page "/"
@inject NavigationManager NavigationManager

<div class="form-inline mb-4">
    <div class="form-group mr-2">
        <label for="stepsCount" class="mr-2">Steps count:</label>
        <input type="number" min="1" @bind="stepsCount" id="stepsCount" />
    </div>
    <button class="btn btn-primary" @onclick="StartSaga">Start!</button>
</div>

<ul class="list-group">
    @foreach (var message in messages)
    {
        <li class="list-group-item">@message</li>
    }
</ul>
We also need to handle the connection to the server and dealing with message exchanging:
@code{
  private HubConnection hubConnection;
  private List<string> messages = new List<string>();
  private int stepsCount = 1;

  protected override async Task OnInitializedAsync()
  {
      hubConnection = new HubConnectionBuilder()
          .WithUrl(NavigationManager.ToAbsoluteUri("/sagahub"))
          .Build();

      hubConnection.On<string>("Notification", (message) =>
      {
          messages.Add(message);
          StateHasChanged();
      });

      await hubConnection.StartAsync();
  }

  private async Task StartSaga()
  {
      await hubConnection.SendAsync("StartSaga", hubConnection.ConnectionId, stepsCount);
  }
}
As you can see, in the OnInitializedAsync() method we’re initializing the connection to the Hub and registering to the Notification event. The event handler receives the message from the server and appends it to our list of notifications.
Then, in our StartSaga() method we handle the button click by sending a StartSaga message to the server with the desired number of steps, and triggering the execution.
That’s all for today! All the source codes are already available on GitHub, feel free to take a look.
In the next post we’ll take a look at the server and see how OpenSleigh can reduce the overall complexity. See ya!
Did you like this post? Then


